The glitch effect — digital distortion, RGB color splits, and blocky artifacts — shows up everywhere: music videos, gaming intros, tech brand content, and social media. Here’s how to create it from scratch and when to use a pre-built overlay instead.
Method 1: RGB Split (The Foundation)
Every glitch effect starts with separating the red, green, and blue channels and shifting them apart.
Duplicate your footage layer three times. On the top copy, use the Shift Channels effect to keep only the Red channel. On the middle copy, keep Green. On the bottom, keep Blue.
Set the top two layers to Add blend mode. Now offset the Red layer a few pixels to the left and the Blue layer a few pixels to the right. The result is that signature chromatic aberration look.
Animate the position offsets with keyframes — sudden jumps between values (hold keyframes, not linear) look more authentic than smooth motion.
Method 2: Displacement Map
Create a new solid layer with fractal noise. Use high contrast settings so you get hard black and white blocks. Apply this as a Displacement Map to your footage.
The white areas push pixels in one direction, black areas push in the other. Animate the evolution of the fractal noise and you get shifting, organic distortion that looks like corrupted video data.
For a blocky, digital look, use the Mosaic effect on the displacement map before applying it. This turns the smooth noise into rectangular blocks — much closer to actual digital compression artifacts.
Method 3: Time Remapping
Real glitches in digital video often involve frames repeating, jumping, or freezing. You can simulate this with Time Remapping.
Enable Time Remapping on your footage and add rapid keyframes that jump backward a few frames, creating a stutter. Combine this with the RGB split and displacement for a complete glitch.
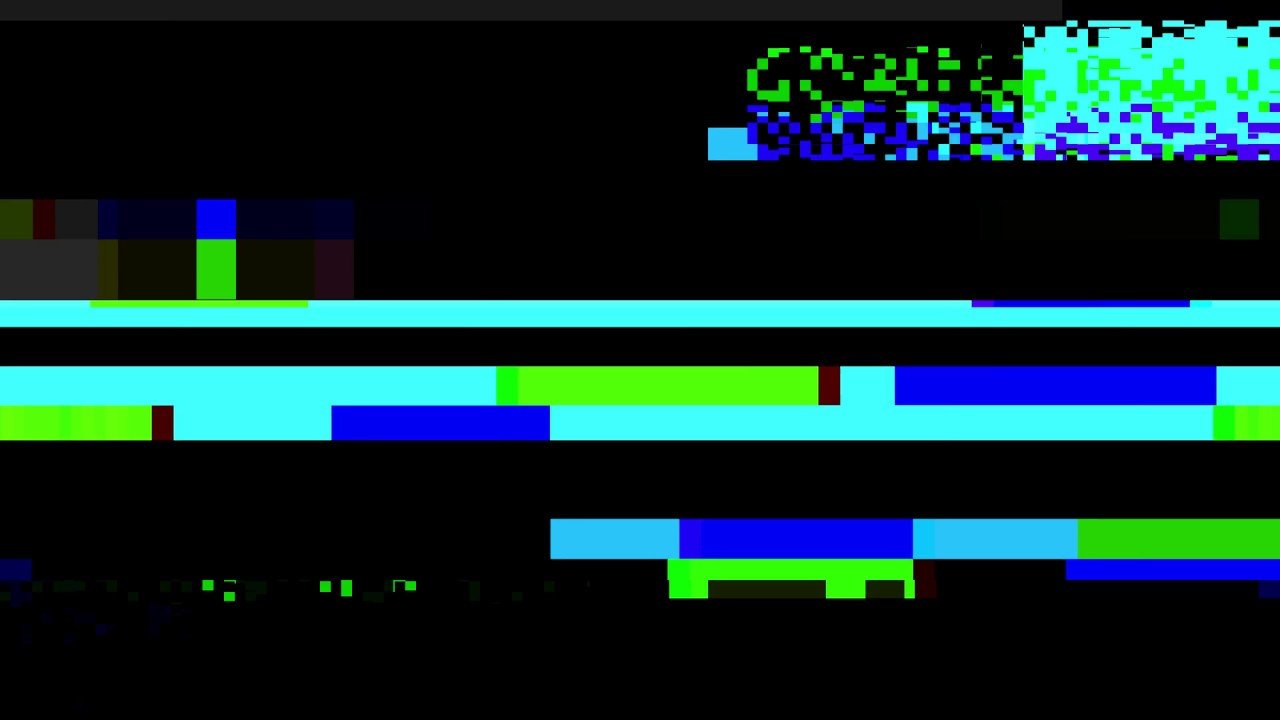
The Faster Alternative: Overlays
Building a convincing glitch from scratch takes time. If you need the effect for a transition or accent rather than a hero effect, a pre-rendered glitch overlay gets you there in seconds.
Drop a glitch overlay on a track above your footage, set the blend mode to Screen (for overlays on black) or key out the green screen, and you’re done. ANFX offers free glitch overlays in 4K that work for quick applications.
The from-scratch approach is better when you need the glitch to interact specifically with your footage — like distorting text or a logo. Overlays are better for full-frame effects and transitions.
Making It Feel Real
Whether you build from scratch or use overlays, these details sell the effect:
- Keep glitch moments short — under one second. Sustained glitching looks like a broken file, not a stylistic choice.
- Add a sound effect. A digital static burst or electrical zap paired with the visual makes the effect feel intentional.
- Don’t overuse it. Two or three glitch moments in a one-minute video is plenty.